Ok, on to the next bit that looks worse than it really is.
Lots of bits on this one so lets start from the top left flip switch.
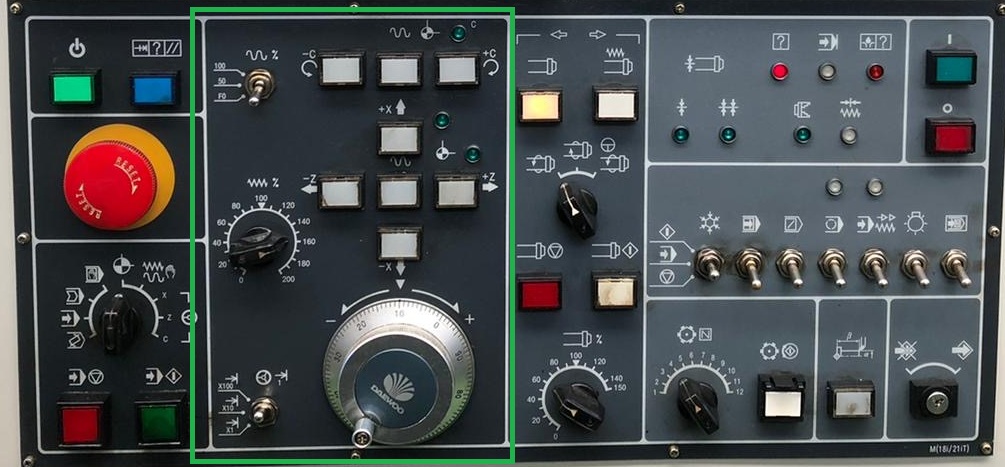
Rapid over ride: This selects the speed that the machine carries out it’s rapid moves. 100%, 50% and 0%, when set to zero (0%) the machine will still move when it is in rapid mode but it will move very slowly. If you just set up a job and your not really sure if you screwed up then it’s a good idea NOT to ram the machine at full speed ahead into what may end up being an almighty bang.(For “bang” read, really f***ing expensive). Pretty much every machine crash happens for 2 very simple reasons, arrogance or plain laziness. You either believe you are so good you don’t make mistakes or you can’t be arsed to check your decisions. A rare third reason can be you basically have no clue what you are doing and think you do.
Middle left rotary switch: Feed rate over ride: This one just reduces the programmed feed rate to something that gives you more chance of spotting a mistake, if the material is a bit unusual or you aren’t quite sure of the feed rates you can use this will allow you to move up or down as a percentage of the programmed feed rate. Very useful, best way? start safe and move up rather than down, you can always adjust the program speed IN the program later. Maybe hard spots, shitty material, problem materials like inconels etc. Handy dial, make use of it to fine tune your work.
Bottom Left Flip Switch: Handwheel move rate: This 3 position switch just changes the rate at which the handwheel moves the axis, 1 microns, 10 microns, 100 microns.
3 Green LEDS: Home positions: if the axis is at it’s home position or reference position, these will light up. (see the bit about referencing/homing the machine earlier on)
3 White Push Buttons, Top right: These are the buttons you use to move the named axis in the directions shown. These 3 move the C Axis (chuck rotation) either + or -. If you press just the direction the machine will move at a feed rate, if you press the middle button AND a direction button the move will be at Rapid rates. Basically they “Jog” the named axis.
5 White Push Buttons, Lower Right: Same as above but for the X and Z axis The Minus and Plus means, Z- = towards the chuck, Z+ away from the Chuck. Same with X, X- towards the centre line, X+ away from the centre line. The middle button being the Rapid Jog and is used as above.
Handwheel, Manual Move: This is used when in Handwheel mode and allows you to move the selected axis a click at a time. It’s a clicky wheel so very easy to control exceptionally small moves (down to micron level) You can machine items in handwheel mode, I don’t recommend it though as there is NO feed back like you get with a manual machine. There are times it’s useful but not very often for manual machining.
On to another page for spindly bits and controls